COLMAP SfM on Pictures from Gammacam images
By Robert Russell
- 13 minutes read - 2674 wordsGammacam P6 produces a lot of output files. It takes photos multiple times a second from each camera. Many pipelines don’t need all of the output. In my case I like using Nvidia Instant NGP to make NeRFs from my photos. The first step in processing pictures to use with Instant NGP is to run the SfM (Structure from Motion) pipeline called COLMAP. COLMAP incorporates a number of well-established photogrammetry algorithms to produce useful data from imagery sets. It’s been cited in many papers and can do a bunch of stuff that I’m really not qualified to describe. Instant NGP has some automated integration with COLMAP but I wanted to install COLMAP separately so that I can also learn to use it independently of Instant NGP.
This is just a brief overview of my workflow. You can learn a lot more from the COLMAP docs. And right up front, thanks to Johannes L. Schönberger and other contributors for making sharing COLMAP as open source.
What is Gamma Camera?
Gamma Camera is my open source flexible camera array project. In the broad sense it’s a collection of software, suggested hardware, and operations instructions for collecting imagery from several cameras connected to small networked computers. The specific implementation I’ve built is gammacam P6 and it’s made from 6 cameras, each connected to a Raspberry Pi 4B. You can read more about on the Github project page or my blog posts tagged Gamma Camera.
What to do with COLMAP to get imagery ready for Instant NGP
COLMAP has a lot of capabilities but here’s how to use it for imagery from gammacam.
- Run feature detection
- Automatic reconstruction to create the sparse model
Feature detection finds identifiable unique combinations of pixels in the photos. Generally this means one or more abrupt transitions in the pixel colour. Simple examples of features would be the a corner or edge of a building, or the sharp points on printed text.
The sparse model describes the pose1 of the cameras when they took each picture. Along with the pose of the cameras, and more important I suppose, is the location of all the detected features in the real world. The way it figures that out is really interesting but won’t try to explain it now. The reason I’m skimming over it is simply that the principle goal of Gamma Camera is to provide the foundation for building your own experiments.
Here we’re only interested in the steps needed to process pictures with COLMAP so they can be fed to Instant NGP. In particular, I’ll try to be very explicit about what paths to use so that both COLMAP and Instant NGP will be happy with the resulting location of the images.
Sampling the imagery
COLMAP runs multiple different algorithms during reconstruction. These algorithms can demand a lot of compute resources. Sometimes they scale with system RAM, sometimes they benefit from more cores - not just GPU performance. There are many parameters to tweak within COLMAP but if you don’t have a lot of background with the software or the academic research that drives it then the easiest path I’ve found is to process a dataset with default settings first and then look in to adjustments. So successfully processing a dataset means adjusting that dataset to fit well within the defaults for COLMAP. I’m going to give some guidance for the number of images, the details in images, and the overlap between the images. These are all based on my limited experience with COLMAP processing a small number of collections with gammcam P6 to produce NeRFs.
Directory structure
My preferred way to deal with experimental imagery datasets is to trade space for simplicity. Each time I perform some kind of culling, image transformation, or filtering, I create a new folder and copy all my files from the previous stage. I create a file with notes on the process or command lines that I ran.
As the manual parts of the process are repeated I streamline the process. A production quality pipeline should be much more optimized for efficient use of space and compute resources. In the early iterations it’s more important to maintain maximal flexibility since we want to make every stage of the processing reversible, repeatable, and explainable.
Here’s a real example in mundane detail so you can copy my process exactly. I have some imagery in a folder named Z:\datasets-hm\gamma-p6\r_1673555646. The name of the folder is simply a tag letter followed by the timestamp that the folder was created. It’s created using the example command for retrieving data from gammacam. The subdirectories in the folder are named for each camera and COLMAP relies on the folder structure to recognize which camera produced which image. This is important since COLMAP can refine a unique set of camera intrinsics for each camera (or use them if they’re provided). Even though all the lenses are similar, assuming that they have the same intrinsic model would have a significant negative effect on the results.
I try to guess what the largest cut will be and make that first. In the case of my dataset I want just the first 40 images from each camera. I like to do shell operations in WSL with bash. So here’s a simple line:
for n in {1..6}; do find gamma${n}/ -type f -name 'frame-0000[0-3]*.jpg' -exec cp {} subset-1/{} \; ; done
This is also the point where I move the files from my NAS to the local drive on the machine where COLMAP is running. Crossing between Windows and Linux on WSL can be an issue here too. WSL uses the 9p driver for some file accesses which adds overhead. It’s unnoticeable on small operations but with many repeated operations it can be immensely more expensive than keeping things on the same filesystem. I run the Windows version of COLMAP and Instant NGP but perform all my shell operations in a Bash shell in WSL.
Even though COLMAP uses the folder structure to match the image file with the camera it came from there are other cases when the camera index needs to be in the filename. So I embed the camera index into the filename as well. Here’s a simple one-liner that will add a prefix with the camera number.
for n in {1..6}; do cd gamma${n} ; for f in * ; do mv ${f} g${n}-${f} ; done ; cd .. ; done
For example, the file gamma1/frame-000099.jpg will be renamed gamma1/g1-frame-000099.jpg.
After performing these file renaming and folder manipulation operations a few times interactively for your pipeline you might also recognize ways to simply create a list of files, manipulate that list, and then operate on files only once. The important thing with the first few times is to get through the entire process though so don’t spend a lot of time automating pre-emptively.
Run COLMAP and create a new project
Instant NGP comes lives under my user homedir in a subdirectory named Instant-NGP - I’ll skip the parent directories for brevity. Create a directory under the data/nerf directory in the Instant NGP install directory. My project today has a signpost in it so I made “…\Instant-NGP\data\nerf\signpost”. Under “signpost” create a couple more directories:
- Make the “…\Instant-NGP\data\nerf\signpost\images” directory and copy all the PNG files from the subset folder there, keeping the directories “gamma1” through “gamma6”.
- Create the “…\Instant-NGP\data\nerf\signpost\colmap-project” directory where the
project.inianddatabase.dbwill be saved. - Finally make a directory “…\Instant-NGP\data\nerf\signpost\sparse-text” which will be used to export the sparse model from COLMAP for Instant NGP.
In COLMAP, create a new project: click File > New Project. There are two settings to fill in.
-
Click
Newnext to the database field, browse to “…\Instant-NGP\data\nerf\signpost\colmap-project” and just type the name “database”. The SQLite database will be saved here when COLMAP creates it later. -
Click
Selectnext to the images field and open the images folder. Click save after filling out both fields.
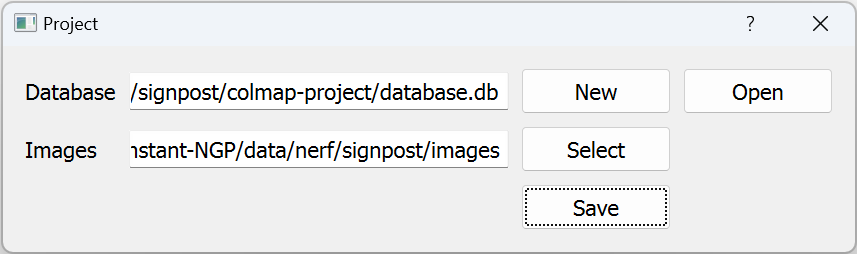
Go to File > Save, navigate to “…\Instant-NGP\data\nerf\signpost\colmap-project” and give the project file a name like “project.ini”.
Next click Processing > Feature Extraction
Turn on “Shared per subfolder”. This tells COLMAP that each folder has images from a different camera. I set “OPENCV_FISHEYE” for the camera model 2. Click “Extract”. Feature extraction starts. There will be some log output as each image is found and features are discovered. The dialog stays open when feature extraction is complete, just click the x to close it. Save the logs by clicking the “Save” button and put the file under “signpost\colmap-project\feature-extraction-1.log”.
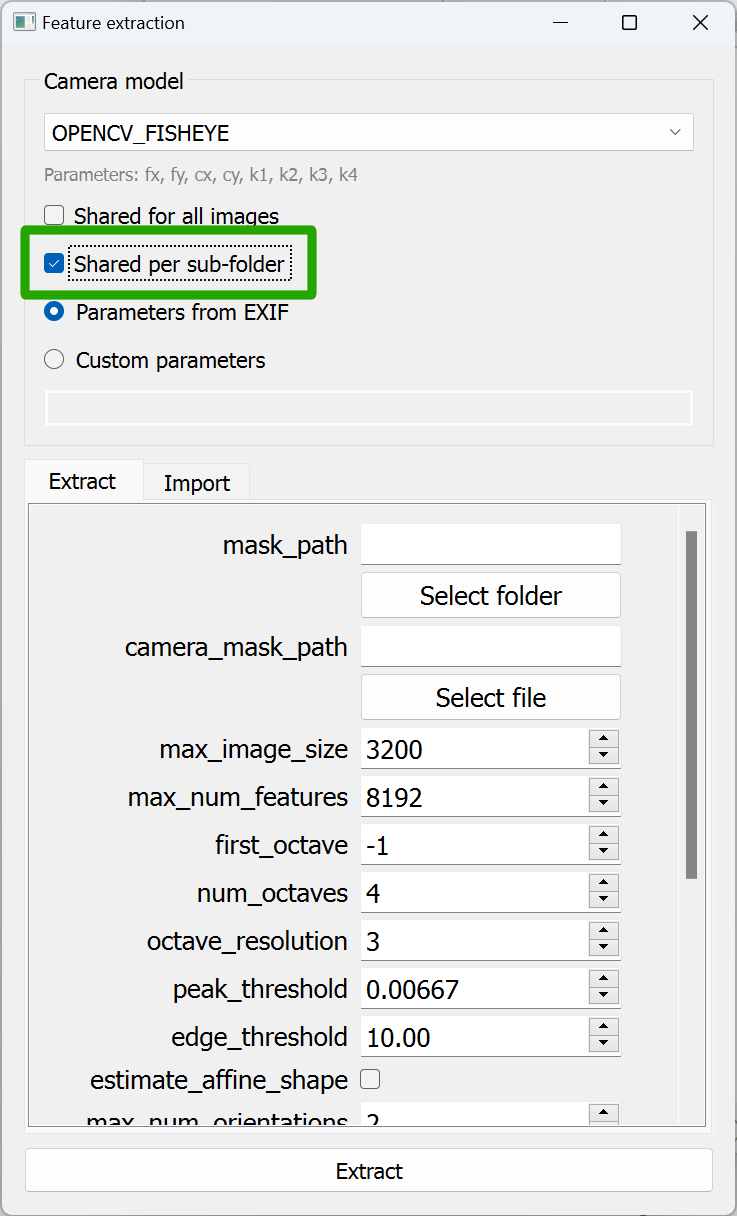
Next go to Processing > Database Management and click the Cameras tab. You should see that COLMAP came up with 6 distinct cameras. Click the x to close the window if they’re all there. If not then double-check the “Shared per subfolder” setting for feature extraction is on and “Shared for all images” is off. Also confirm that your images are split up across subfolders under the images folder.

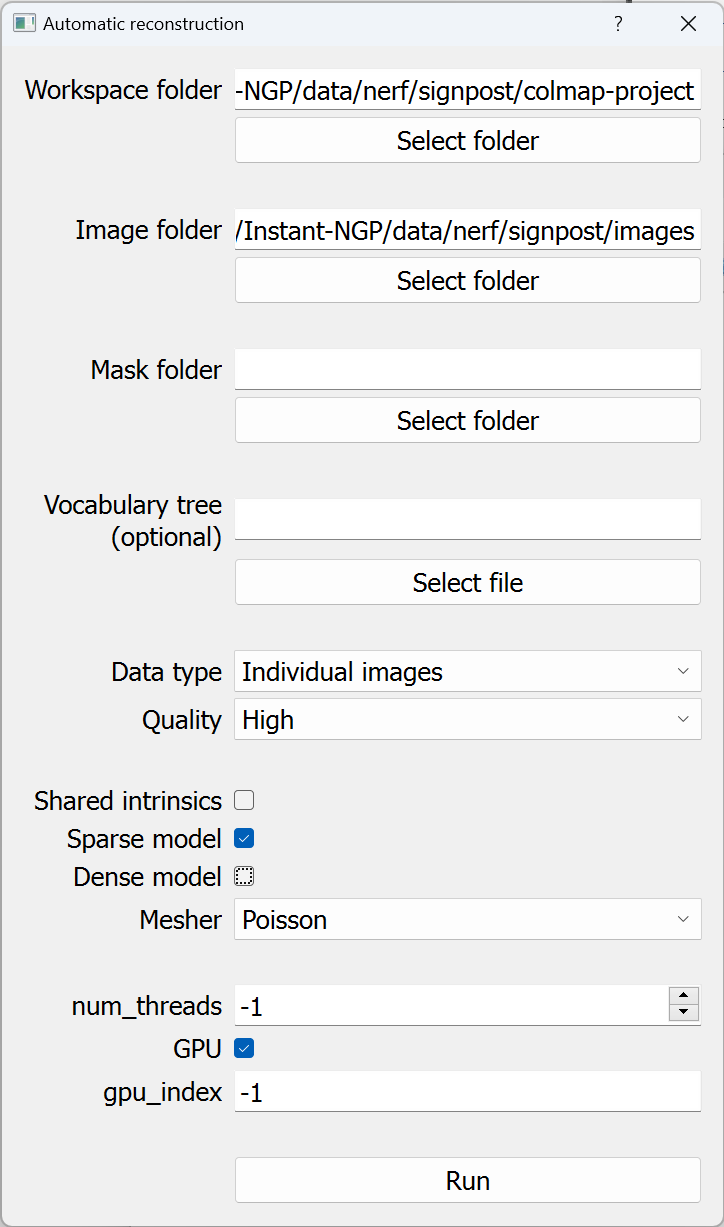
Now that feature extraction is complete it’s time to start the sparse reconstruction. On the Reconstruction menu click Automatic Reconstruction. In the Automatic Reconstruction dialog that shows up, uncheck the “Dense Model” box. COLMAP can produce sparse or dense models and we only need sparse for our purposes. Creating the dense model takes a lot more time. For the workspace folder, I use “…\Instant-NGP\data\nerf\signpost\colmap-project” and for the image folder put in “…\Instant-NGP\data\nerf\signpost\images”
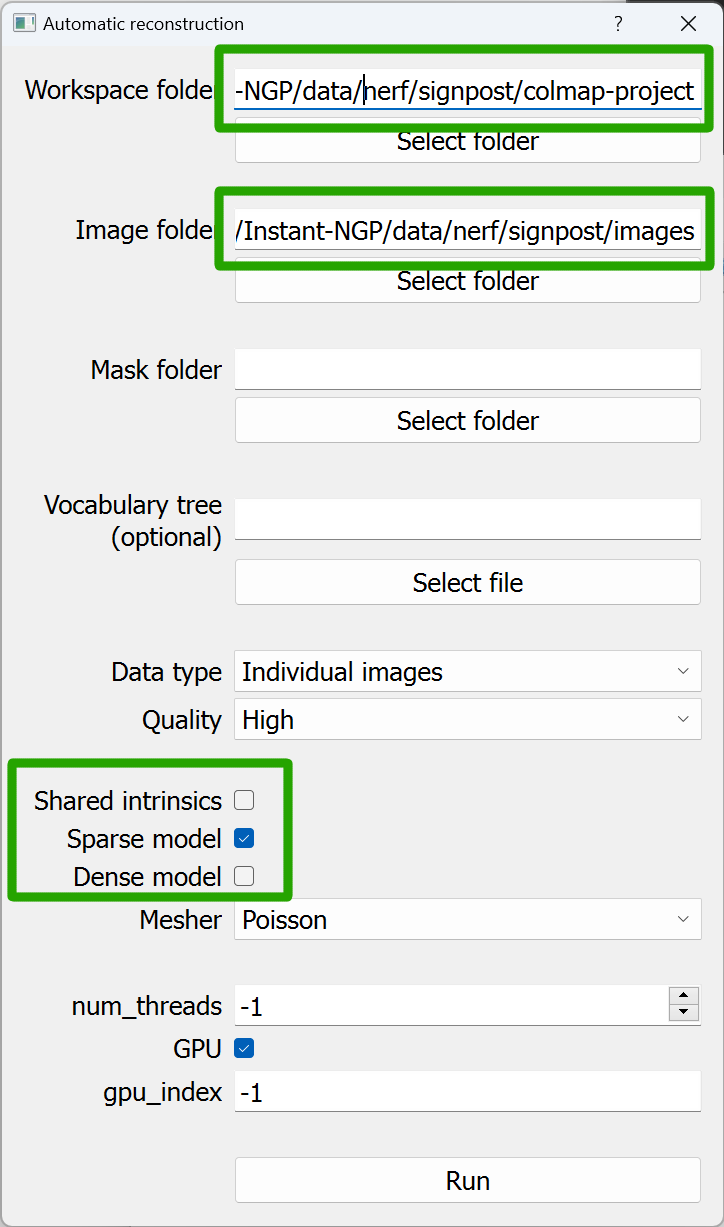
Click Run. As things start running, the logs will indicate that COLMAP skipped feature detection for all the images. That’s because it’s already been done and features are in the database for our images.
Now just wait a really long time. It’s hard to make quick generalizations about how long the automatic reconstruction will take but I think in this case I had 240 images, 1.9M features total, and sparse reconstruction was complete in under an hour. To process this I used a Ryzen 9 7950X with an Nvidia RTX 3090Ti. At different times it used all available CPU cores or fully utilized the GPU but I never observed all 24GB of GPU RAM in use or more than 20GB of system RAM (which is less than half of what’s available). Some of the tasks really do seem to scale with the number of CPU cores available.

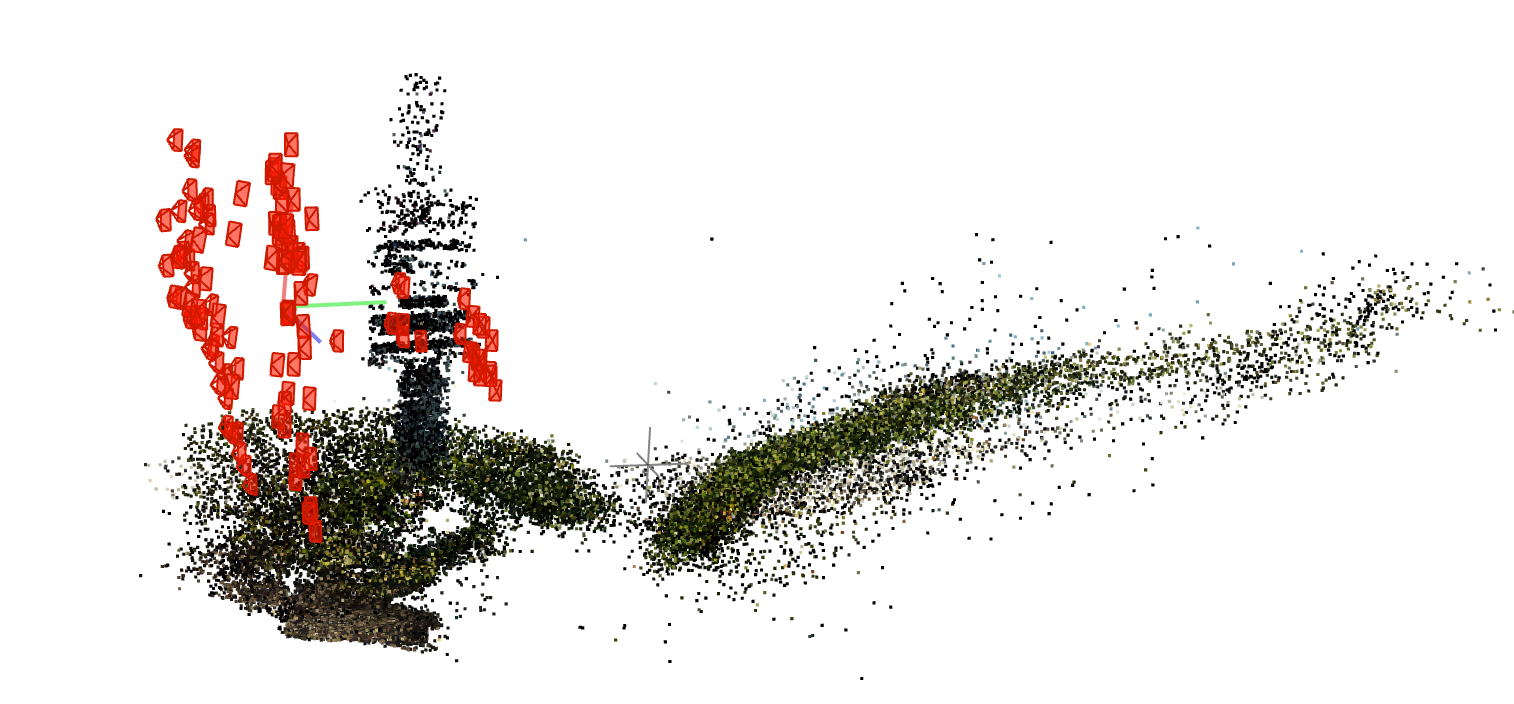
After the automatic reconstruction process completes you should see a point cloud and cameras in the 3d-viewer pane. What you’re looking at are the positions of all the features in the scene and where the cameras were when the photos were taken. Well, the most reasonable mathematical reconstruction of those points and cameras based on the images provided anyway.
Click the Save button on the Logs pane to save the logs with a name like “signpost\colmap-project\automatic-reconstruction-1.log”

The defaults for COLMAP 3d viewer make the cameras really big and the points really small. I find it more satisfying to crank up the size of the points and shrink the cameras. It’s a really naive way of guessing if the sparse reconstruction looks believable or not. Adjust the sizes with the dialog that loads from Render > Render Options.
When I was first getting a handle on how to run this process I wasn’t sure what exactly I was looking at. I mean, there’s a project folder but what exactly has been created and how do I load this project and get back to the same state. The view in the 3d viewer is the sparse model. If you close COLMAP and want to see it again then open up COLMAP, click File > Open project, pick “signpost\colmap-project\project.ini”. After it loads, go to File > Import model and navigate to “signpost\colmap-project\sparse\0” then click the “Open Folder” button. The thing that feels odd is the term “Import” for something that seems to be part of the project. Really the sparse reconstruction is an output of the project. Maybe if you perform additional reconstructions then you’d want to create additional folders for them, I’m not sure.
Every directory named gamma<N> may contain the original images or per-image artifacts. We’re not interested in those right now (and they might indicate the automatic operation has done more work than we really needed here).
The important part is that now the pose of the pixels has been calculated. In order to use the pose information in Instant NGP the data needs to be converted to a different coordinate system and data format. The COLMAP project has what we need in some of the .bin files. Specifically, the sparse model is saved in “…\Instant-NGP\data\nerf\signpost\colmap-project\sparse\0” as cameras.bin, images.bin, and points3D.bin.
Converting coordinates for Instant NGP
Instant NGP needs the points and cameras from the sparse model but the Python script needs a text version of the model. To produce the text format version of the model use File > Export Model… in COLMAP. Save the files at “…\Instant-NGP\data\nerf\signpost\sparse-text”. After exporting the directory will have cameras.txt, images.txt, and points3D.txt.
Now we have everything we need from COLMAP. Instant NGP provides a script called colmap2nerf.py. I do something a little complicated here. I prefer to use Python on the Linux side in WSL when I can. So I have a copy of the script in ~/code/nerf-transform/colmap2nerf.py and I run it from WSL in a Python virtual env. So I run the command like this in the Instant-NGP/data/nerf/signpost directory:
. ~/code/nerf-transform/.venv/bin/activate
python ~/code/nerf-transform/colmap2nerf.py --text=sparse-text --images=images --aabb_scale 16
Here the flag --text=sparse-text refers to the sparse-text directory and --images=images refers to the images directory. Running it in the signpost directory makes it copy/pastable for other projects as long as I use the same directory structure.
It runs pretty quickly and ends with output like this:
...
./images/gamma6/g6-frame-000035.jpg sharpness= 502.01756746534517
./images/gamma6/g6-frame-000036.jpg sharpness= 284.27652259572375
./images/gamma6/g6-frame-000037.jpg sharpness= 309.80959787211737
./images/gamma6/g6-frame-000038.jpg sharpness= 288.8220685038657
./images/gamma6/g6-frame-000039.jpg sharpness= 311.54360678409404
up vector was [-0.27530781 -0.07498741 -0.9584271 ]
computing center of attention...
[-0.28110115  0.68912728  4.86339899]
avg camera distance from origin 5.733609385540058
240 frames
writing transforms.json
The file transforms.json is what Instant NGP needs and it will be in the signpost directory.
$ Instant-NGP/data/nerf/signpost$ tree | grep -v "jpg"
.
├── colmap-project
│   ├── automatic-reconstruction-1.log
│   ├── database.db
│   └── sparse
│       └── 0
│           ├── cameras.bin
│           ├── images.bin
│           ├── points3D.bin
│           └── project.ini
├── images
│   ├── gamma1
│   ├── gamma2
│   ├── gamma3
│   ├── gamma4
│   ├── gamma5
│   └── gamma6
├── sparse-text
│   ├── cameras.txt
│   ├── images.txt
│   ├── points3D.txt
│   └── project.ini
└── transforms.json

11 directories, 251 files
Bringing the dataset into Instant NGP
This part is relatively easy now. Run instant-ngp.exe and when the window shows up, just drag the “…Instant-NGP\data\nerf\signpost” folder onto it. Training will start right away.
And just to show that it works, after just a few minutes of training I placed a few cameras to make this loopy video.

Wrapping up
At the risk of underselling my work here, I have to emphasize that I’m dipping into some specialized software situated in a research area which goes broad and deep in endless directions. So even as I’ve written down my process here I’m finding more and more ways to improve or possibilities to explore. There are recommendations I’ve made here that are surely suboptimal but the goal is to produce one completed result so that the process can be repeated by others and improved. I know I want to find ways to make the most of my resources for faster and more accurate results. Your resources and goals will be different, I encourage readers to follow links back to the manual and source code and document your own corrections and improvements (and try it out so you can make your own mistakes too).
-
Pose means the location of each camera and the direction that the camera is facing. That means x, y, z coordinates along with an angle from each axis (or something equivalent to these). ↩︎
-
This might not be the best choice for my data. My lenses are fisheye and I believe that a model with more parameters should be better with many images. Something I read in the docs makes me suspect SIMPLE_RADIAL_FISHEYE might be a better fit. ↩︎